Autobump Documentation
Table of contents
- Description of Autobump
- Analysis
- Description of modules
- Build guidelines
- Deployment guidelines
- Guidelines for the developer
Description of Autobump
What is Autobump?
Autobump is a bot that automatically creates pull-requests to keep dependencies of your projects up to date. It scans the build files, and automatically detects out-of-date dependencies using the the configured version repositories. It then creates a pull-request for every outdated dependency.
What problem does Autobump solve?
It is important to regularly keep the dependencies of your projects up to date. External libraries are habitually updated to solve security issues and other vulnerabilities, and to enhance features. However, it is time consuming and not very exciting to be checking for updates, adjusting the build files and testing whether everything still runs as it should. When developers wait too long with these necessary updates, they not only fail to take advantage of improved features, but also risk breaking things once they finally do make the necessary bumps. Autobump takes this arduous task off the plate of developers. It incrementally updates all dependencies when new versions are released. Autobump relies on the existing build pipelines of the repository to test whether anything breaks when the update is implemented.
How does Autobump accomplish its goals?
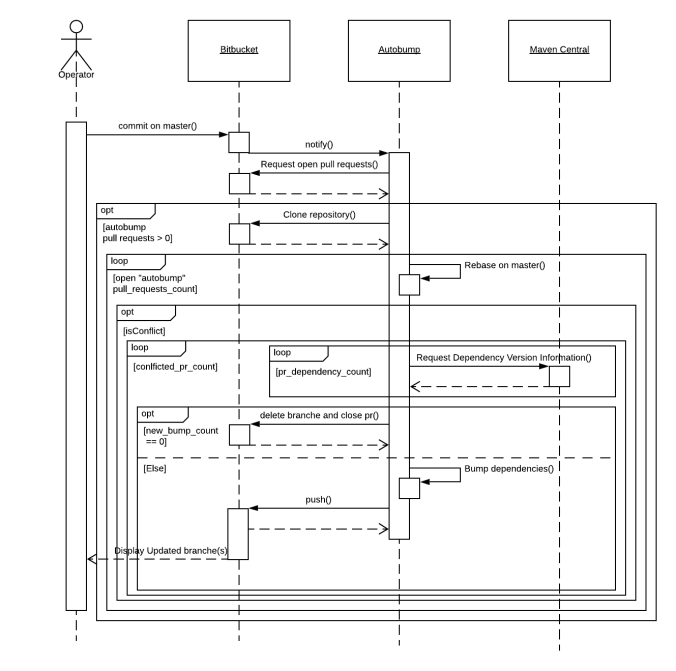
Autobump makes a temporary git clone of your Bitbucket repository and extracts the build file where all dependencies are described. It then extracts all dependencies and checks whether new versions are available in the Maven Central Repository. If a new version has indeed been released, Autobump creates a new branch in the repository, updates the build file and commits and pushes the new branch to your remote repository. It then creates a pull request, and includes release notes of the new version if they are available on GitHub. If the build pipeline in your repository succeeds, you may merge the new pull request with the click of a button in Bitbucket. The flow is visualised in the figure below.
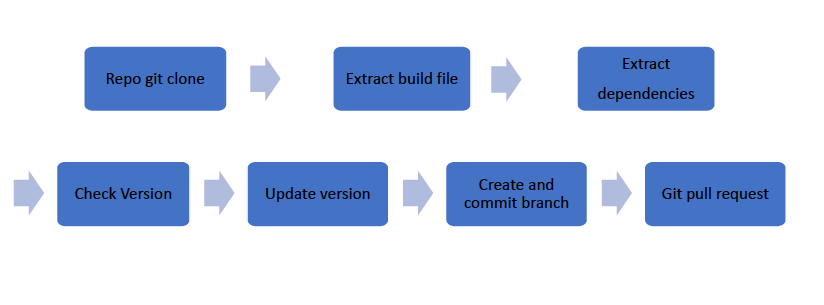
Figure 1. Flow of Autobump
Support
Autobump currently supports:
- Build tool: Maven
- Version repositories: Maven Central
- Git providers: Bitbucket
- Release notes sources: GitHub
Autobump clients
To date, Autobump includes two clients: a command line interface and a spring boot web app, that is integrated in BitBucket as a BitBucket Cloud app.
Autobump Spring boot
Alternatively, you can use Autobump Spring boot, a Bitbucket Cloud app that is integrated in your Bitbucket Workspace. When you go to https://prod.autobump.be you can hit the install-button.
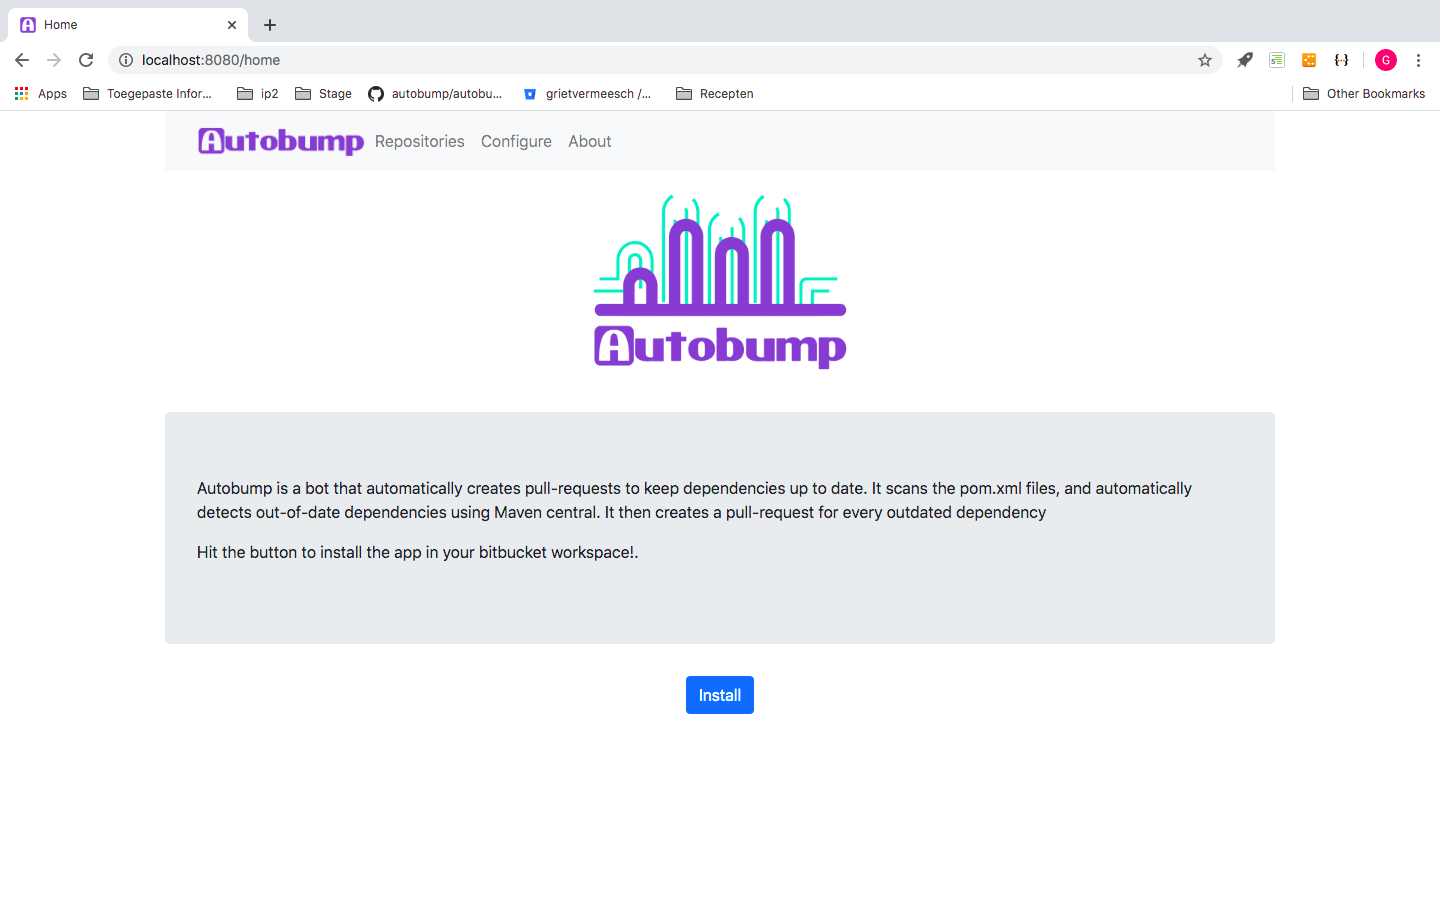
Figure 2. Page to install Autobump in a BitBucket workspace.
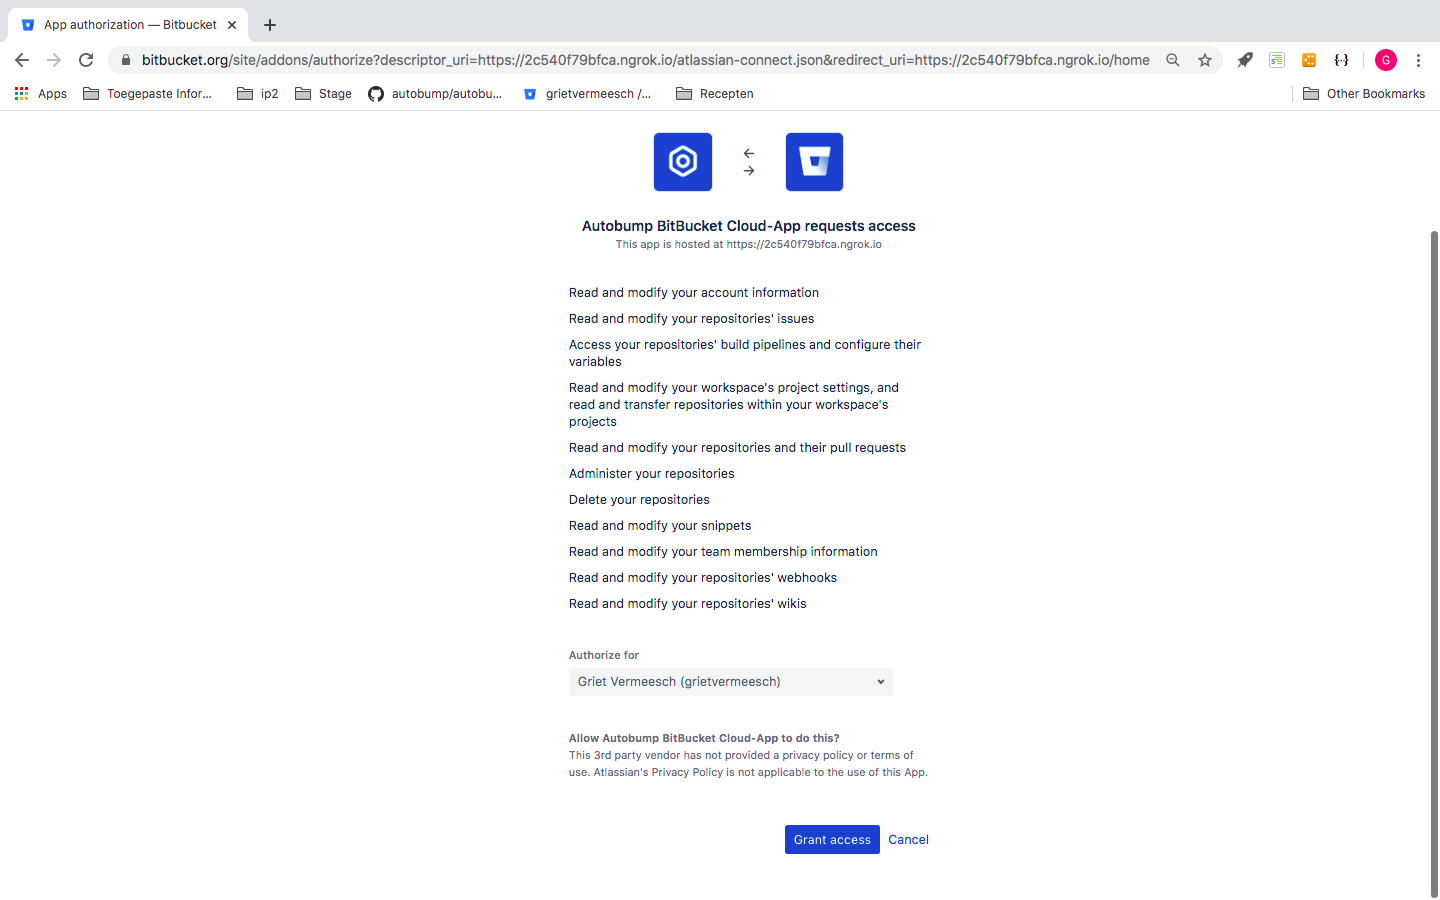
Once you are authenticated in BitBucket, you are prompted to grant Autobump access to your BitBucket workspace.
If you click ‘Grant Access’, you land on the homepage of the Autobump dashboard, where all the repositories of your BitBucket workspace are listed. You can now select the repositories you want Autobump to monitor.
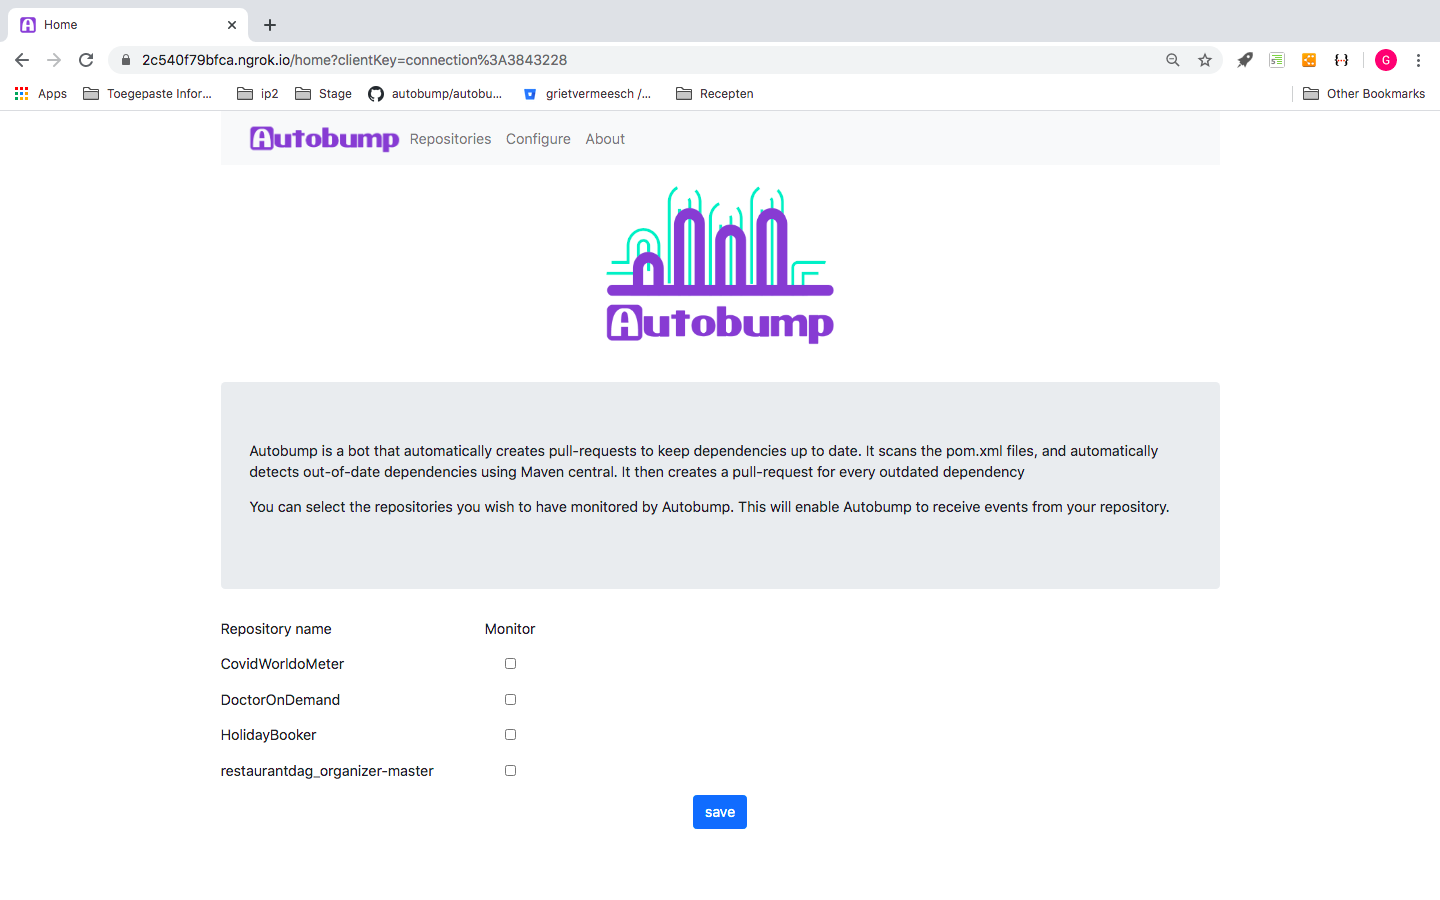
Figure 3. List of the repositories in a BitBucket workspace, imported in Autobump.
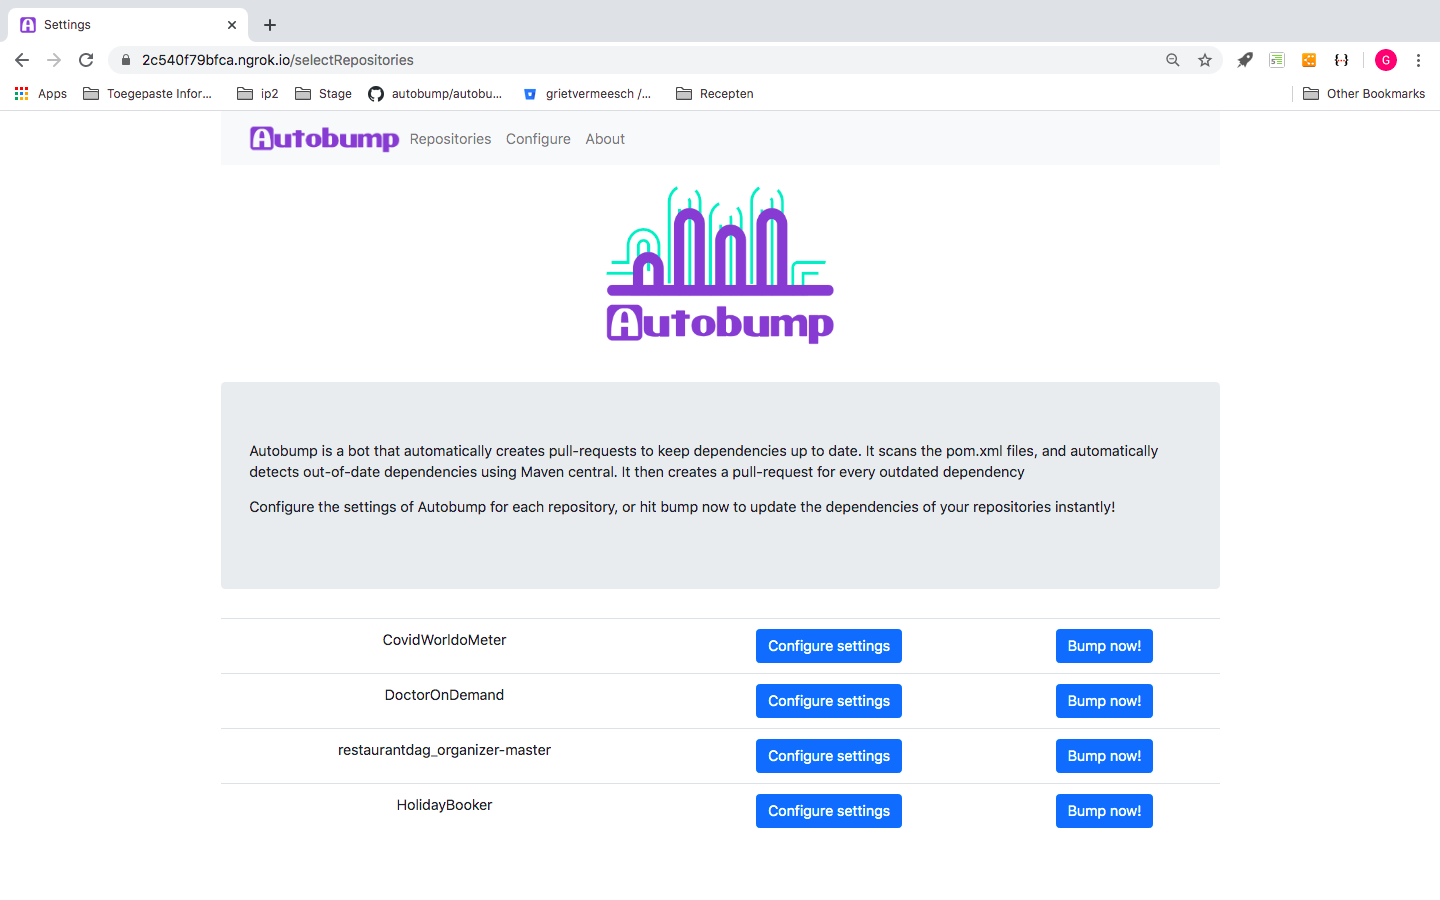
Figure 4. Page to configure or bump repositories.
After saving, you can then hit the ‘Bump now!’ button to run Autobump for your repositories. If your repositories contain outdated dependencies, you will soon see the first pull requests appear in your BitBucket workspace! If notes on the new release are available in Github, they are included as a comment in the pull request.
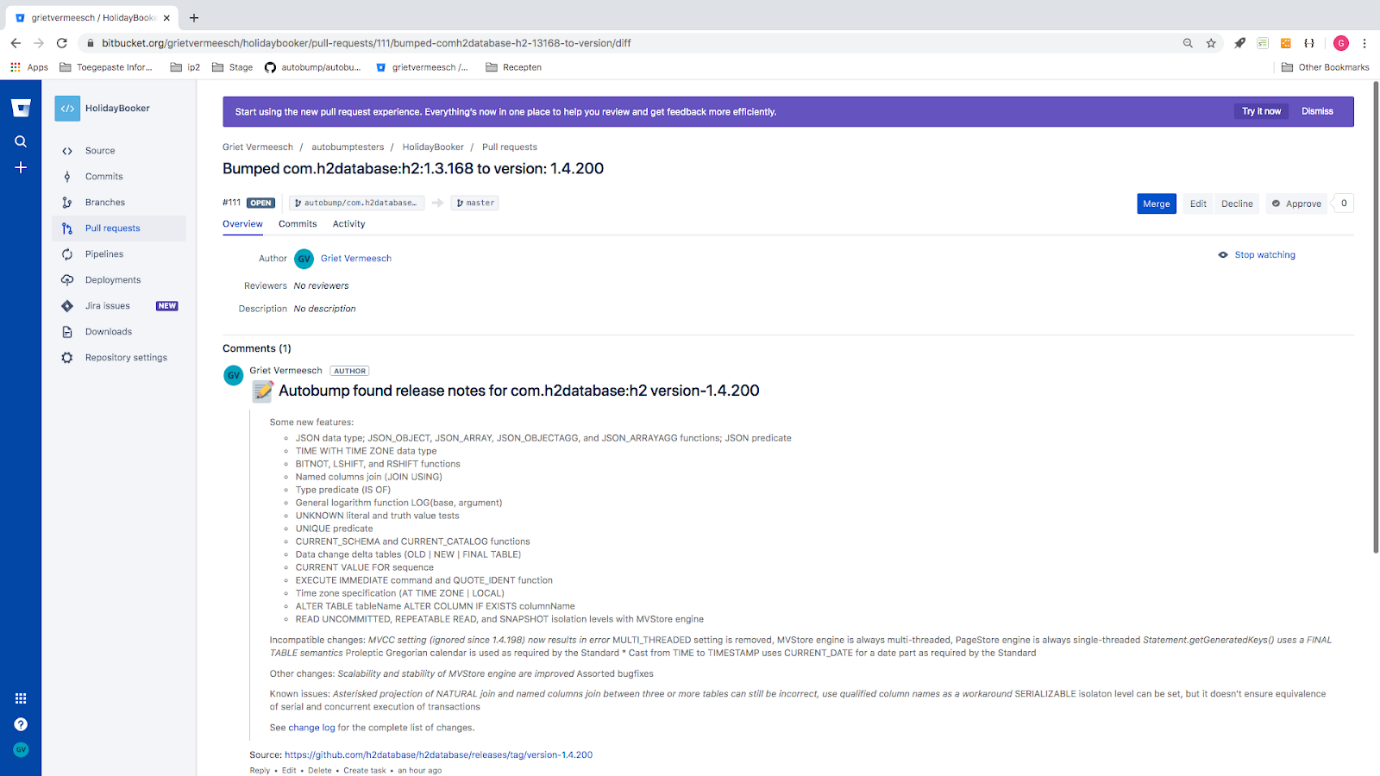
Figure 5. A pull request issued by Autobump, that includes release notes.
Command line interface
You can run the application through a command-line interface. To bump a repository, enter your credentials (username and password of your BitBucket account) and the url of the repository you want to have bumped. In addition, you can specify dependencies you do not wish to have bumped. You can also specify whether ‘major’ or ‘minor’ updates need to be ignored. The help-page of the command-line interface is depicted in Image XXX.
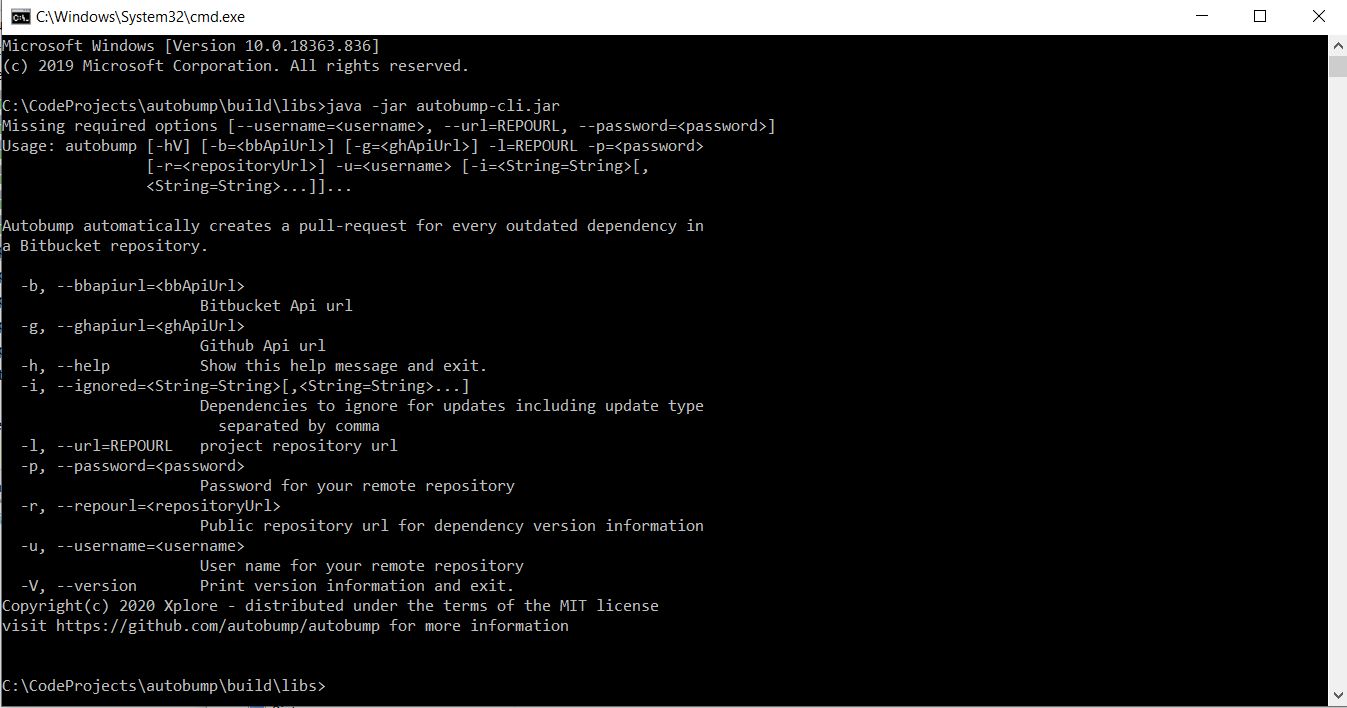
Figure 6. The help-page of Autobump commandline interface.
How to configure Autobump
You can configure the settings of the Autobump Spring Boot application, both by a dashboard and through commenting pull requests issued by Autobump. In the dashboard, you can opt for having your repositories monitored daily. It is also possible to enter the username of a developer, who will be notified when Autobump has issued a new pull request.
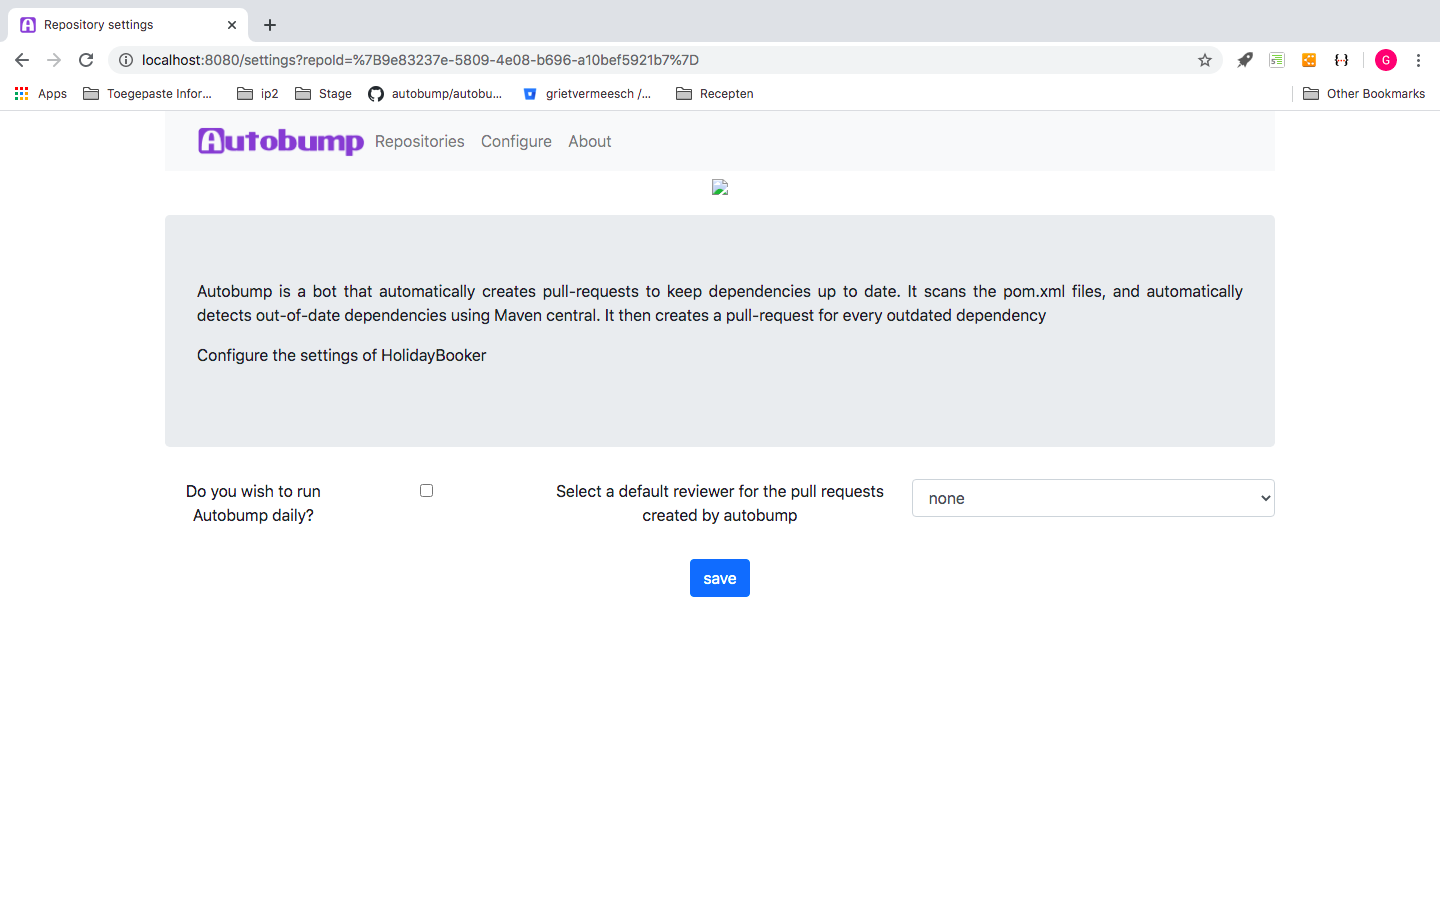
Figure 7. Configuration page for a repository.
Autobump may be configured to ignore updates for minor or major releases of particular dependencies. To that end, enter the comment “ignore this major” or “ignore this minor” in the comment-field of the relevant pull request upon declining it. Autobump will then save this new setting and display it in the dashboard. If you decline a pull request without adding a comment, Autobump will no longer create pull requests for that particular version.

Figure 8. Using a comment on a pull request in BitBucket to configure Autobump to ignore updates.
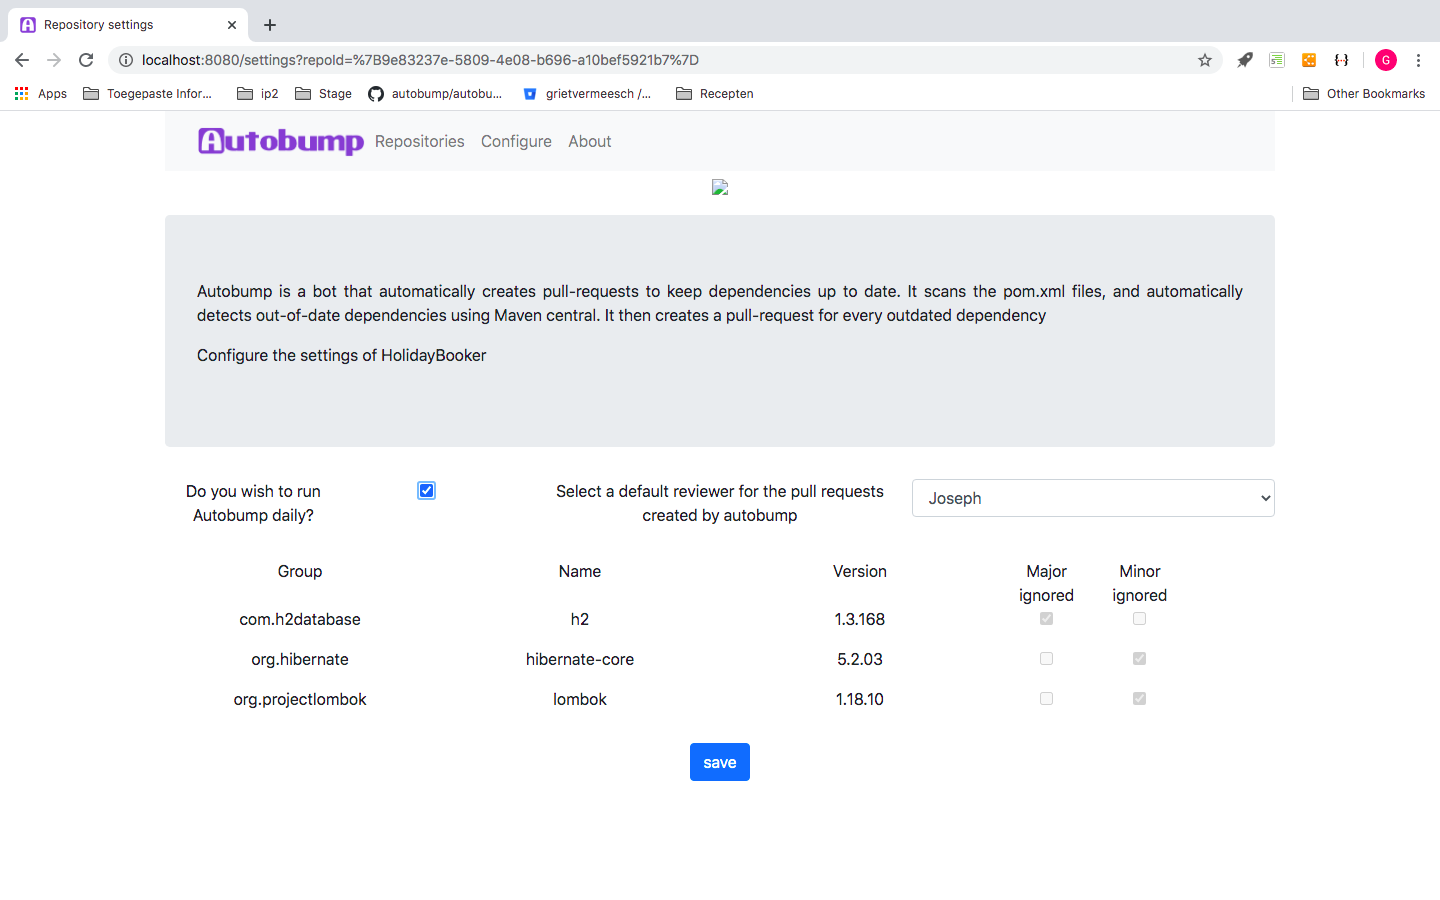
Figure 9. Configuration page of a repository, that displays ignored dependencies.
Analysis
Uses cases
Create pull request
As a developer I want Autobump to create a new pull request to bump a dependency to the latest available version.
Rebase pull requests
As a developer I want Autobump to automatically rebase pull requests when new commits are made onto the target branch.
Comment "Ignore this minor"
As a developer, I want to be able to comment "Ignore this minor" on a Autobump pull request. Autobump should ignore all minor and patch versions within the same range.
Comment "Ignore this major"
As a developer, I want to be able to comment on an Autobump PR with "Ignore this major". Autobump should update its Settings and not notify me again about updates within this major version range.
Bitbucket Cloud App
As a developer I want to integrate Autobump Spring Boot in my Bitbucket Cloud workspace.
Ignore update
As a developer, when I close a pull request, I want Autobump to ignore the bump and not notify me again about this update until a new version of the same dependency is available.
Supersede pull request
As a developer, I want Autobump to automatically supersede existing pull requests to avoid having to close outdated pull requests manually.
Comment on superseded pull request
As a developer, I want Autobump to leave a comment on a superseded pull request, explaining that the pull request was superseded by another pull request. The comment includes a link to the new pull request.
Include release notes in the pull request description
As a developer, I want Autobump to include release notes in the pull request description if they are available in order to save time when reviewing the pull request.
Web dashboard
As a developer, I want Autobump to provide me a minimal web dashboard that allows me to configure which repositories to bump and modify the configuration settings for those repositories.
Schedule run
As a developer I want Autobump to schedule a run for every repository once per day.
Assign reviewer
As a developer, I want to be able to configure Autobump to assign a user as reviewer for pull-requests that are created by Autobump.
Architecture
C4-architecture
In this project, we adopt the C4 model for visualising our software architecture. The four C’s denote Context, Containers, Component and Code (or Classes). Each of these stands for a particular diagram that maps on respective levels of abstraction and describes the software system at varying levels of detail. On the highest level – i.e. Context – the diagram visualises the software system in its wider context, including its interactions with users and external systems. This diagram is typically comprehensible for a wider audience with limited technical knowledge, who want to get a general idea of the purpose of the software. One level below, the Container diagram pictures the collaboration between various ‘containers’, i.e. apps and data stores, and how they collaborate. This diagram is especially pertinent to microservice architectures, and therefore less applicable to our purposes. Third, a diagram on Component-level visualises the internal structure of one container. For instance, the dependencies among the modules of a multi module application are typically visualised on this level. Lastly, the Class diagram contains the highest level of detail. The hierarchy of the C4-architecture is clarified by the figure below.
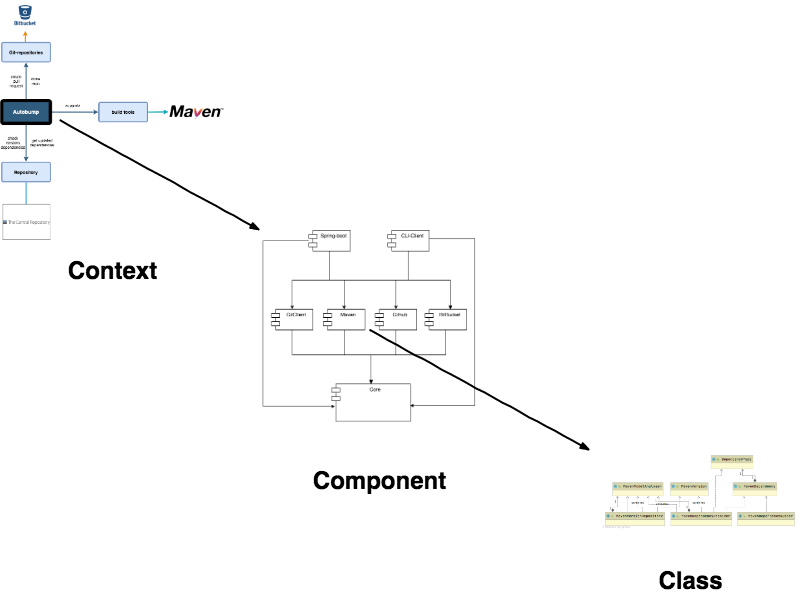
Figure 10. Overview of the C4-architecture. the 'Container'-level has been excluded here, because it is less pertinent to the Autobump architecture.
Context
The main interactions between Autobump and external systems are depicted in figure 11. The business flow starts with a git clone in BitBucket cloud. Autubump extracts all the dependencies for Maven projects, and then checks for each dependency whether any new versions have been released. If this is the case, Autobump performs a bump for each outdated dependency and creates a pull request in Bitbucket.

Figure 11. The architecture of Autobump on Context-level.
Component
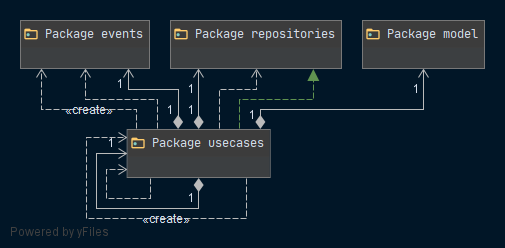
Figure 12 elucidates the dependencies among the modules of Autobump. The key-role of the core module is plainly evident. All modules depend on it. The CLI-Client and the Spring-boot module also have dependencies on the four implementing modules. When new implementations are added in the future, these clients can be extended with additional dependencies. Similarly, Autobump can easily be extended with additional clients.
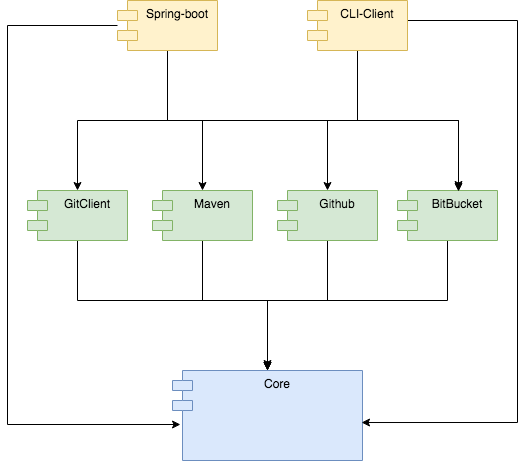
Figure 12. The architecture of Autobump on Component-level.
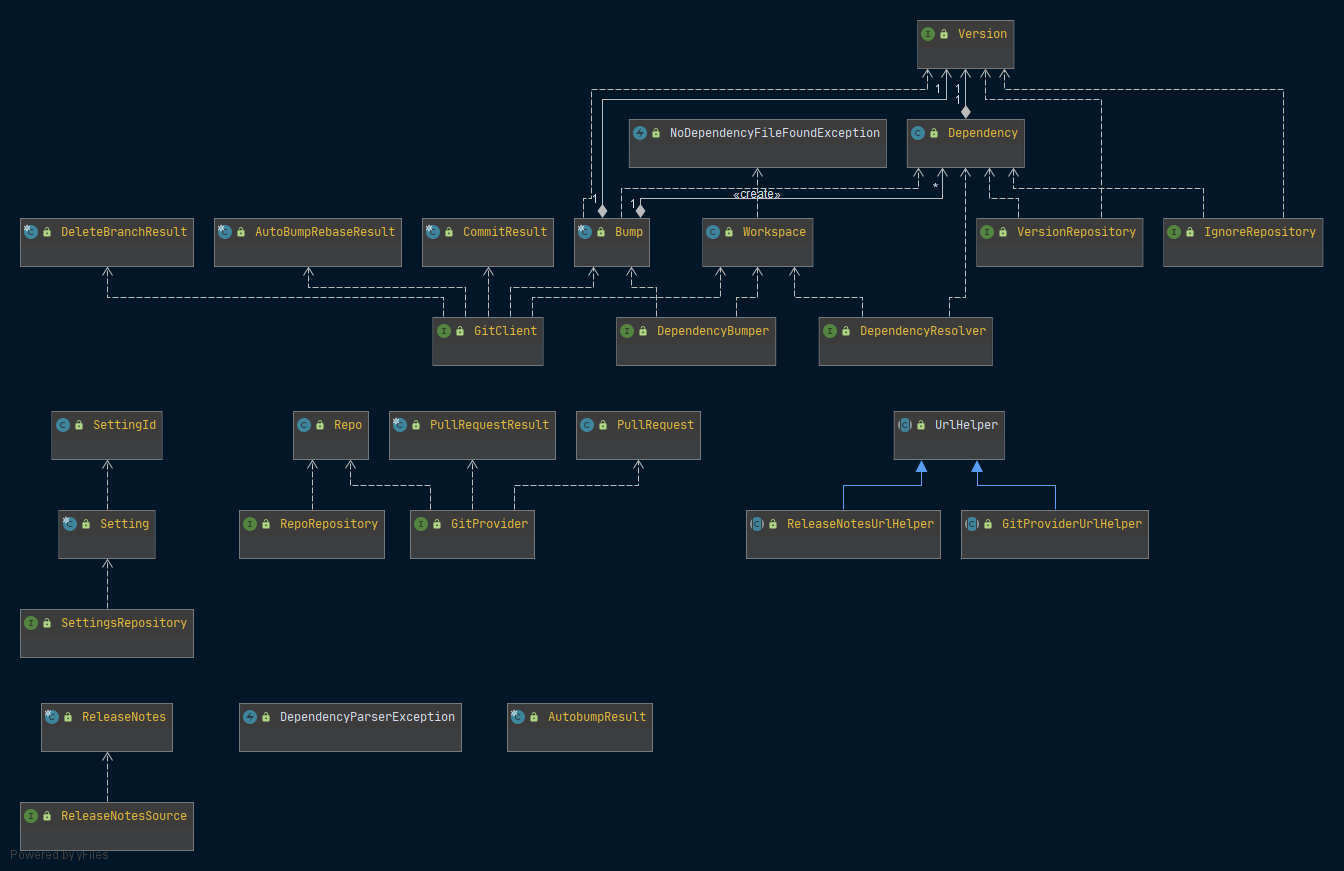
Code
Lastly, package diagrams and domain class diagrams offer a granular view of the architecture of Autobump. These are discussed in the section ‘description of modules’ below.
Hexagon-architecture
The hexagon-architecture is yet another model for visualising our software architecture. It exemplifies the SOLID principles that have guided the Autobump design. The acronym stands for
-
Single responsibility: a class should have only one responsibility. If it is to be changed, it should be for one and only one reason.
-
Open-closed: classes and interfaces should only be extended, never changed.
-
Liskov substitution: If objects are replaced by one of their subtypes, it should never have a negative impact on the application.
-
Interface segregation: Interfaces should be confined to limited functionalities. It is better to have many small than one large interface.
-
Dependency inversion: classes should depend on abstractions, not implementations.
Embracing these principles leads to adaptable software that is easy to monitor. The architecture of Autobump adopts these principles by strictly separating a core module one the one hand, and implementing modules on the other. Thus, the hexagon architecture of Autobump comprises a core-module that contains a range of interfaces with a limited number of functions, and classes with one single responsibility, that may in the future be extended rather than changed, and that have a high level of abstraction. The interfaces act as ports to the core. Around this stable core lives a range of implementing modules, containing adapters that access the core via the ports. The opportunity for change and enhancement fully lies in these implementing modules that can easily be extended or changed without jeopardizing the stability and maintainability of the application.
The adaptability of Autobump is evidenced by the hexagon-architecture in figure 13. It includes a selection of the ports and adapters in the application. For instance, the core module has a port (an interface) for interacting with a SettingsRepository, where configurations are to be saved. Autobump has three different adapters: a MariaDB in de development environment, an H2 database in the testing environment and Amazon Aurora in the production environment.
Autobump has a module that supports the bumping of Maven projects, that include adapters to implement the core ports DependencyResolver and DependencyBumper. However, additional modules for gradle- or npm-projects can easily be created, again without endangering the stability and maintainability of Autobump.
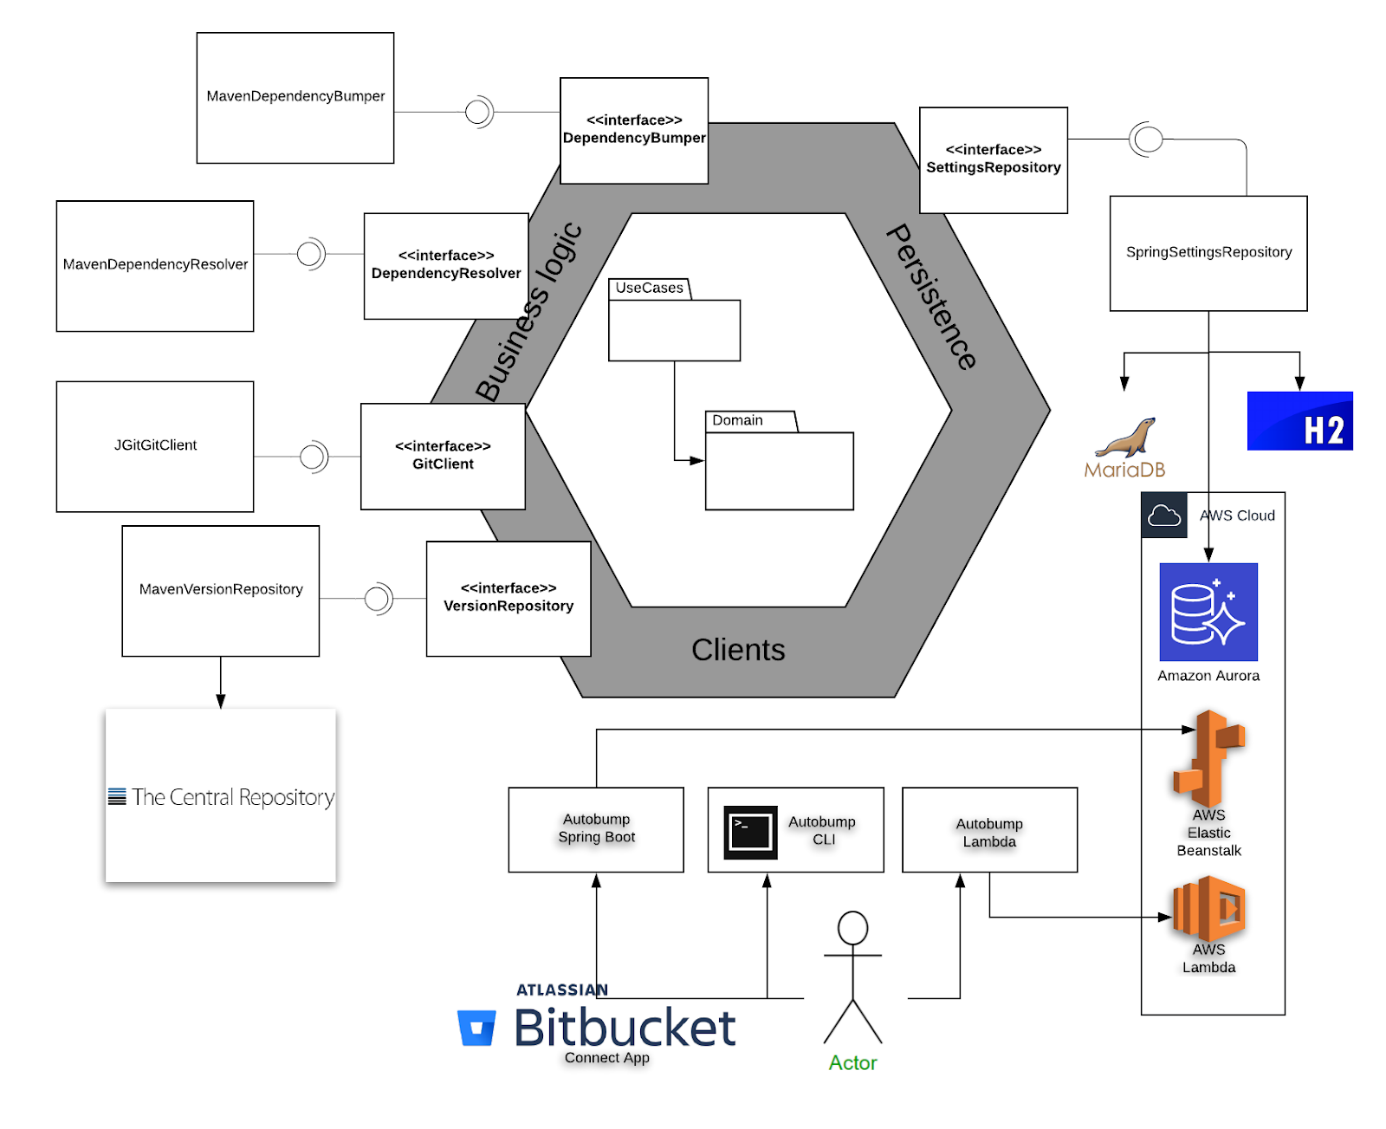
Figure 13. The hexagon architecture of Autobump.
Opportunities for extending the Autobump
architecture
The clean architecture of Autobump allows for easily extending and enhancing support for bumping a wide array of projects. Figures 14 and 15 depict an architecture that may be accomplished by adding two more modules (in purple) to the code base. Additional clients (in yellow) may be added as well.
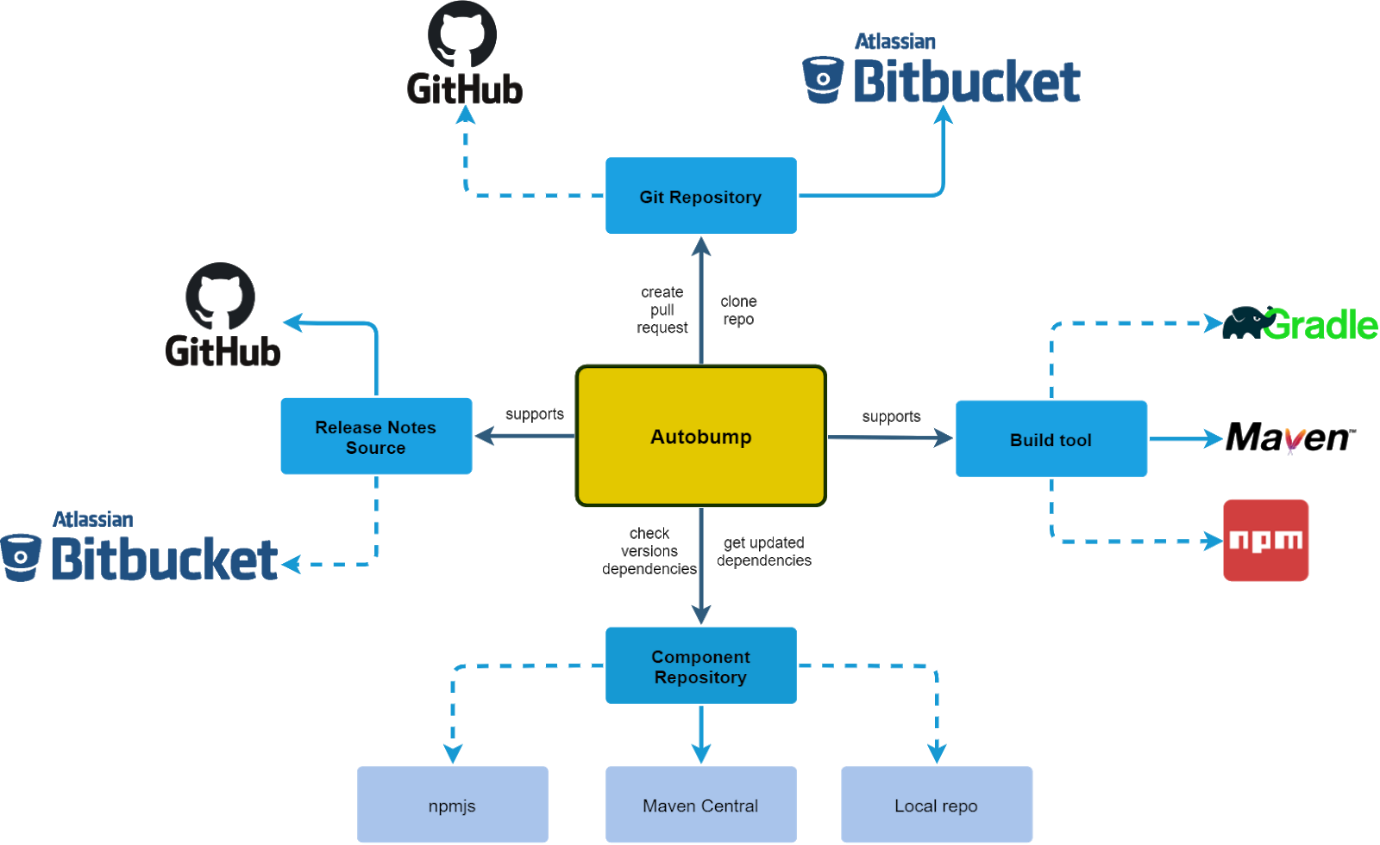
Figure 14. Extended Autobump context-diagram.

Figure 15. Extended Autobump component-diagram
Description of modules
Core
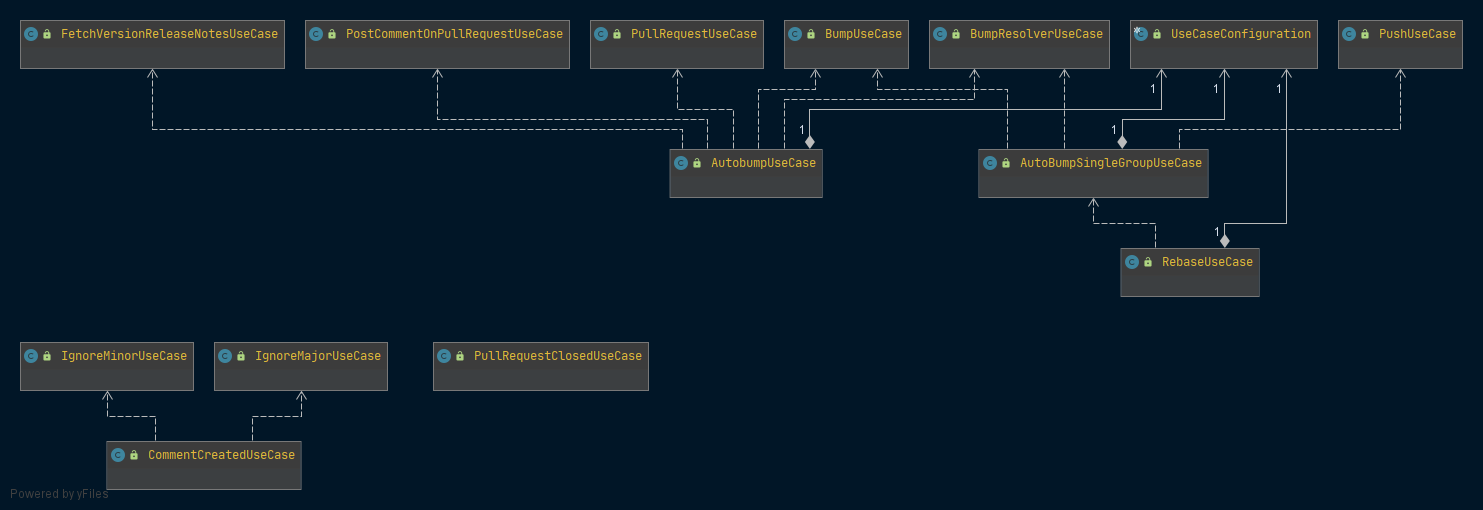
The core module comprises all the building blocks that enable the functionalities of Autobump. On the one hand, a package of Use Cases is included where business logic is applied. On the other hand, the core-module contains a range of generified classes and interfaces, building blocks to accomplish the business flow.
The Use Cases are small stateless objects with limited responsibility that are typically invoked by client-modules to perform the business flow. A quick glance at the Use Cases instantly shows what business operations Autobump supports. For instance, the ‘PullRequestUseCase’ is responsible for handling the creation and posting of a pull request to a git provider. The ‘FetchVersionReleaseNotesUseCase’ is similarly self-explanatory. The main UseCase is the AutoBumpUseCase that assembles the main business flow of the application.
Importantly, the core module is fully agnostic of details of implementation. The interfaces act as ‘ports’ that may be accessed by ‘adaptors’, i.e. classes that implement those interfaces. Adapters live in modules that depend on the core-module. For example, interaction with git providers for cloning repositories or creating pull requests is made available by an interface ‘GitProvider’ in the core-module. The ‘bitbucket’- module in Autobump then includes a BitBucketGitProvider class that implements interaction with the BitBucket api. A GitHubGitProvider can easily be added to the github-module. Similarly, the generified classes in the core-module are open for a wide range of implementations. While Autobump may in the future be enhanced with many additional implementations, the core-module is expected to remain largely unaffected.
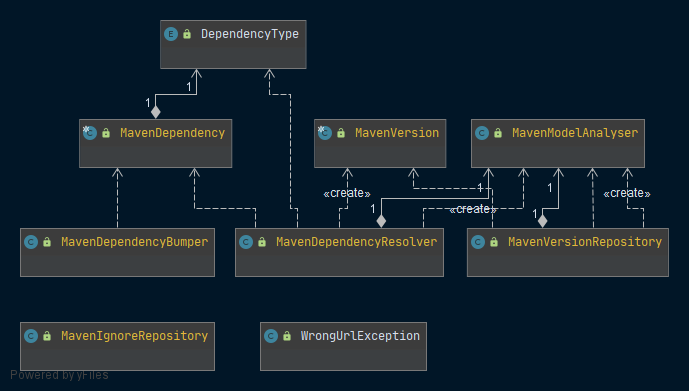
Maven
In this module, Autobump provides support for Maven projects. It includes adapters that rely on the ports of the core module and implement those functionalities specifically for Maven projects. The (simplified) class diagram in figure XXX summarizes the main objects and collaborations between Maven-specific objects, invoked by the Use Cases in the core-module. A MavenDependencyResolver is responsible for extracting the set of dependencies from the build file of a cloned project. It collaborates with a MavenModelAnalyser that assists extracting versions of dependencies. Autobump takes into account the various ways dependencies are expressed in pom.xml files by defining a DependencyType. Once all dependencies have been extracted from the pom.xml file, the MavenDependencyBumper steps in to create the bumps.
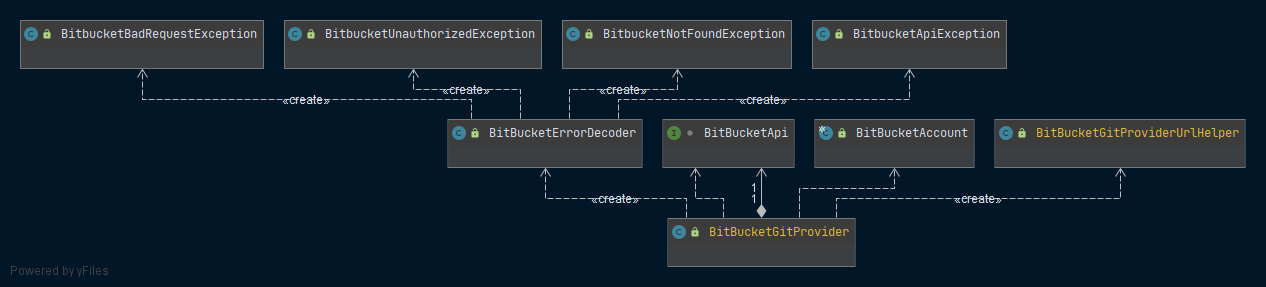
Bitbucket
This module manages all interaction with the BitBucket api. Figure XXX displays the central role of the BitBucketGitProvider that uses the BitBucketApi interface to make rest-calls. Authentication is covered by the BitBucketAccount class; a BitBucketUrlHelper assists extracting data from urls; and the BitBucketErrorDecoder provides custom exceptions.
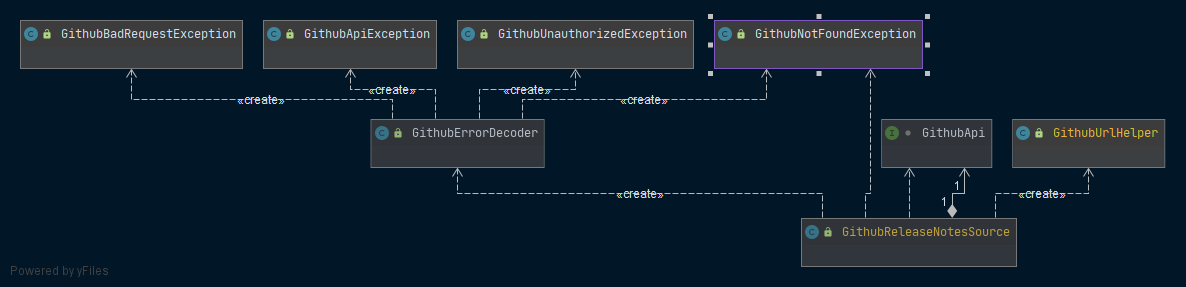
Github
Interaction with the Github-api is implemented in the github-module. Presently, it mainly includes a GithubReleaseNotesSource that uses the GithubApi-interface to obtain releasenotes of new versions of dependencies, which may be added to the comment of a pull request.
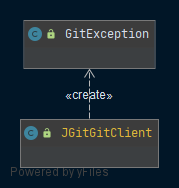
JGit
The JGit-module contains an adapter for implementing the core-interface GitClient. It uses the JGit library for issuing git commands, such as a git clone, the creation of a new branch, committing and pushing to a branch or rebasing from the master branch.
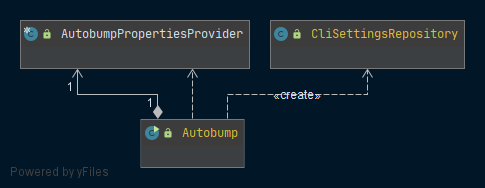
CLI
Presently, there are two clients for running Autobump. The first one is included in the CLI-module, and provides a command line interface that allows for invoking Autobump for one repository. The class Autobump contains the main-method that fires the AutobumpUseCase, and thus automatically creates a pull-request for every outdated dependency in the project. The AutobumpPropertiesProvider assists at prompting the user for the required cli-input.
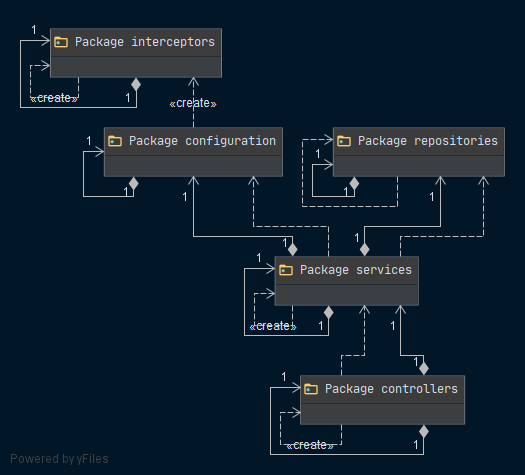
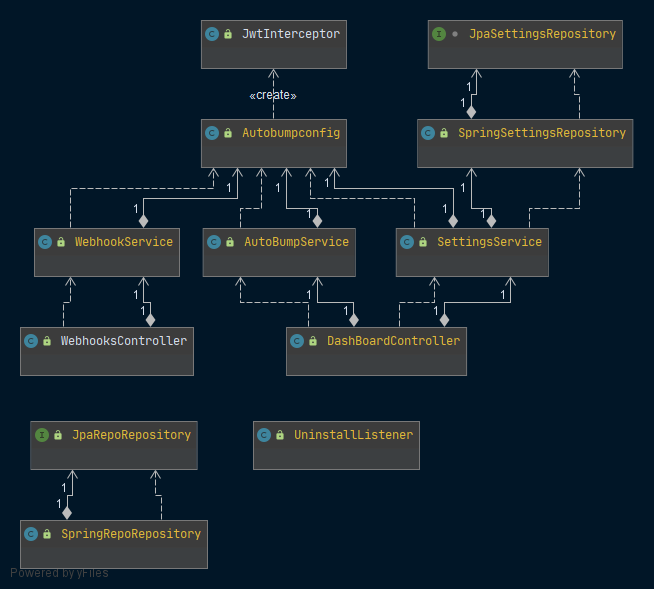
Spring-boot
Lastly, a second client is managed by the Spring-boot module, that is responsible for the integration of Autobump in BitBucket cloud, and making it available as a BitBucket Cloud App. Connection to BitBucket is handled by an atlassian-connect.json file in the resources folder. The Spring-boot module is designed based on the MVC-pattern. Two controllers provide an interface to the application. The WebhooksController includes the rest-endpoints for webhooks (events) coming from the repositories in BitBucket Cloud. The controller passes these events on to the WebhooksService, where the appropriate Use Cases are called. The SettingsController exchanges input with the Dashboard where users select and configure the repositories they want Autobump to monitor. The Spring-boot module also comprises implementation of the repository interfaces in the core-module to persist the repositories that should be monitored, and the settings for those repositories.
External dependencies
The main dependencies on external libraries for the production code of Autobump are:
-
Eclipse JGit: a java library to implement the git version control system
-
Feign: used in the bitbucket- and github-modules, to create java http clients
-
Picocli: a framework to create the Autobump command line application
-
Maven: used for implementing dependency management and parsing of pom.xml files
-
Spring-boot: a framework used for building the web app
-
Atlassian-connect-spring-boot: a framework for building an Atlassian Connect App
Build guidelines
PMD & checkstyle
When building the project by running:
./gradlew autobump:build
PMD and Checkstyle will automatically run code checks for every module and will report possible errors in the console.
The configuration files for PMD and Checkstyle can be found in:
config/pmd

config/checkstyle
If you opt for not addressing the issues reported by PMD or Checkstyle, the \@SupressWarnings annotation is available for disabling checks.
Jacoco
The jacoco plugin is used to report on test coverage. When running:
./gradlew autobump:test
jacoco will automatically check the test coverage and will generate a report in html format that is located in:
build/reports/jacoco/codeCoverageReport/html/index.html
Note: When running the html page, make sure javascript is enabled.
Github Actions
The yml files for the configured github actions are located in: .github/workflows
Please consult the github documentation for configuring the workflows: Configuring a workflow.
Main workflow
The main workflow runs the build. In the event of failed build, the workflow fails. The actions tab in github then displays the errors.
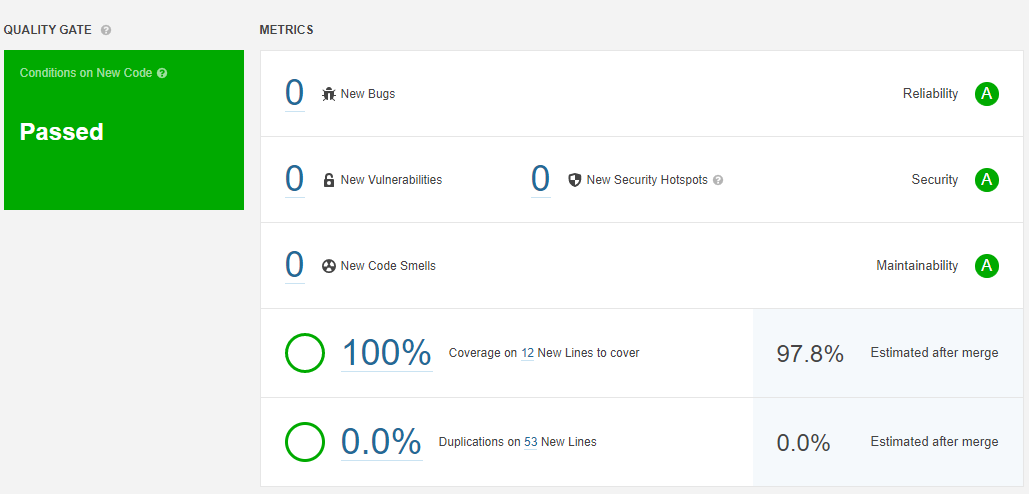
Sonarcloud pr
The sonarcloud pr workflow runs every time a pull request is made or updated. This workflow performs static code checks to scan for vulnerabilities, bugs, code smells , security hotspots and the percentage of code duplication. In addition, sonarcloud analyses the test report generated by jacoco and reports the code coverage on the newly added code. After these checks, sonarcloud posts a comment on the pull request with a summary of the report. There are a few quality gates that must be met:
-
test coverage on the new code must be ≥ 80.0%
-
code duplication on the new code must be < 3.0%
-
maintainability rating on new code must be ≥ A*
-
reliability rating on new code must be ≥ A*
-
security rating on the new code must be ≥ A*
* Information about the calculation of these scores can be found at SonarCloud.
Sonarcloud will make an overview page per pull request where a summary of the results is listed:
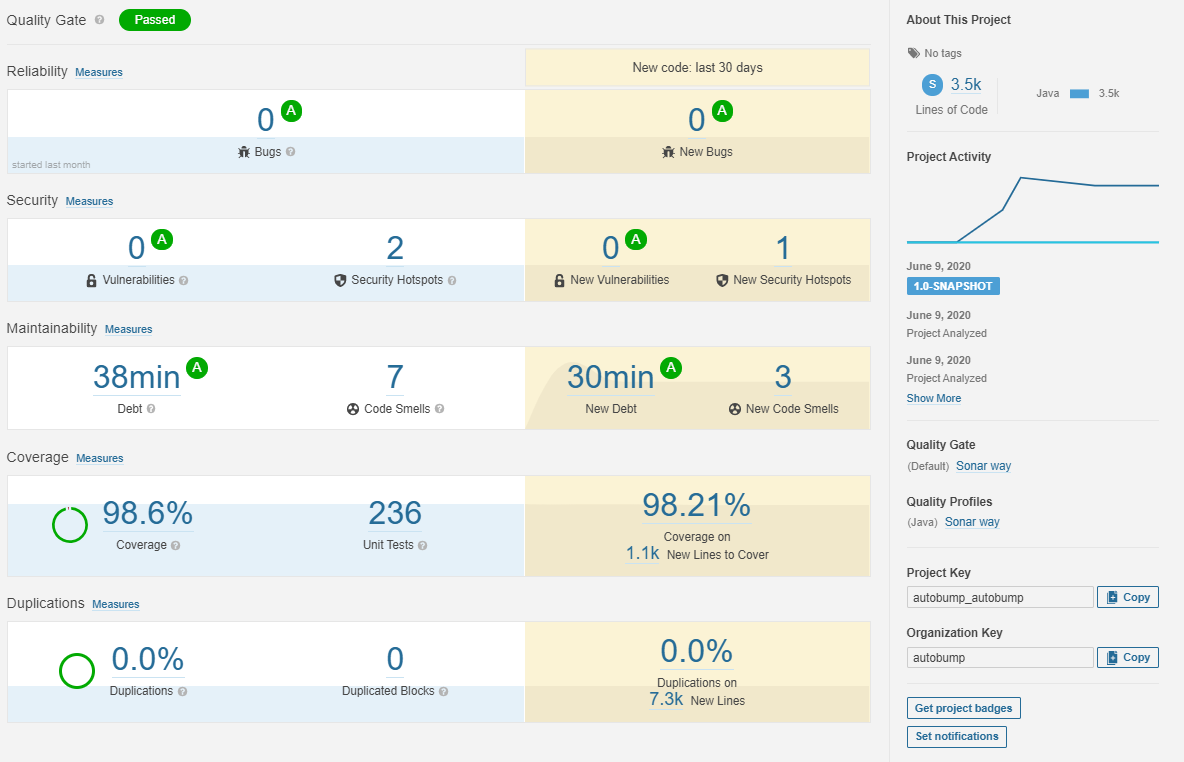
Sonarcloud
The sonarcloud workflow is similarly executed every time a push to master is made. This prompts sonarcloud to reanalyse the whole project and then report it on the main overview page: https://sonarcloud.io/dashboard?id=autobump_autobump
Deployment guidelines
General guidelines
-
The application must be deployed with https enabled. this is required for the bitbucket integration.
-
The spring application by default listens on port
8080. -
The spring profile must be set to
prodwhile running in production.
Deploy guidelines
To deploy the application:
1) Build the jar file of the spring-boot module. Navigate to the root directory of the project and enter:
./gralew autobump:jar_springboot
2) When gradle has finished running, navigate to the autobump-spring-boot/build/libs/ folder where the autobump-spring-boot-1.0-SNAPSHOT.jar file is located.
3) Optional: upload the jar file to the aws Elastic Beanstalk by going to the the AWS Elastic Beanstalk page and selecting the autobump-env-prod environment. Use the filepicker to upload the newly created jar file.

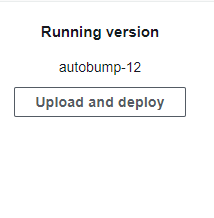
Then press the 'Upload and deploy'-button under the running version section .
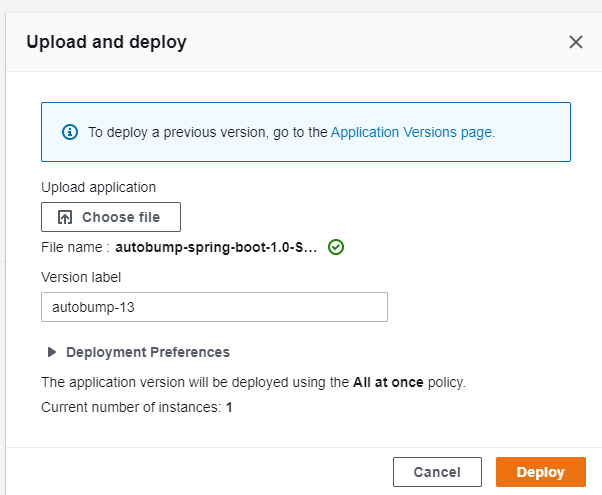
AWS will autofill the version label for you. If you have selected the correct jar file, you can press the ‘deploy’ button to start the upload and deploy process. The new version should be up and running within minutes.
Guidelines for the developer
As has been elaborated above, the clean architecture of Autobump allows for easily extending its functionalities. The strict separation between business logic in the core and implementation logic in the implementing modules ensures that the application is open for additional or different implementations. Nonetheless, the existing code base may be open for modification as well. In this section, we list a number of issues we have encountered and that may be reconsidered by developers who wish to continue developing Autobump.
Bitbucket integration
The application can be installed on the BitBucket cloud by clicking the button on the application home page or by adding it by url from within the bitbucket workspace settings. Owing to technical issues with the Atlassian Connect library, this currently only works for one workspace per application only. A new approach is required regarding the install flow to ensure an Autobump account can be matched with incoming webhooks. To achieve this, we would suggest reconsidering usage of the Atlassian Connect library. After all, this library is not designed to be used with BitBucket, as has been discussed at the community forum: Doing git operations as a cloud app - Bitbucket Cloud
Authentication
Issues regarding authentication similarly relate to the BitBucket integration and usage of the Atlassian Connect library. Because the library is not intended for usage with BitBucket, Autobump by necessity includes two ways of handling JWT tokens. On the one hand it uses the Atlassian Connect library for incoming requests, and on the other hand it creates custom JWT tokens for outgoing requests. An implementation that can be applied both for incoming and outgoing requests would be better.
Bitbucket Connect App scopes
Currently, Autobump demands all available scopes when a user grants access to a BitBucket workspace. Surely, access should be limited to the scopes it really needs. This needs to be further explored.
Use Case refactor
During an innovation sprint, we have made a branch (usecase_refactor_2_jb) to refactor the use case classes so as to fully leverage the opportunities for dependency injection. To be sure, import the latest version of the master branch before continuing this branch.
Main flows of business logic ###
Autobump currently supports ten Use Cases that bring together the business logic. Below, we elaborate on two Use Cases that are fairly representative for the way Autobump handles the bumping of dependencies.
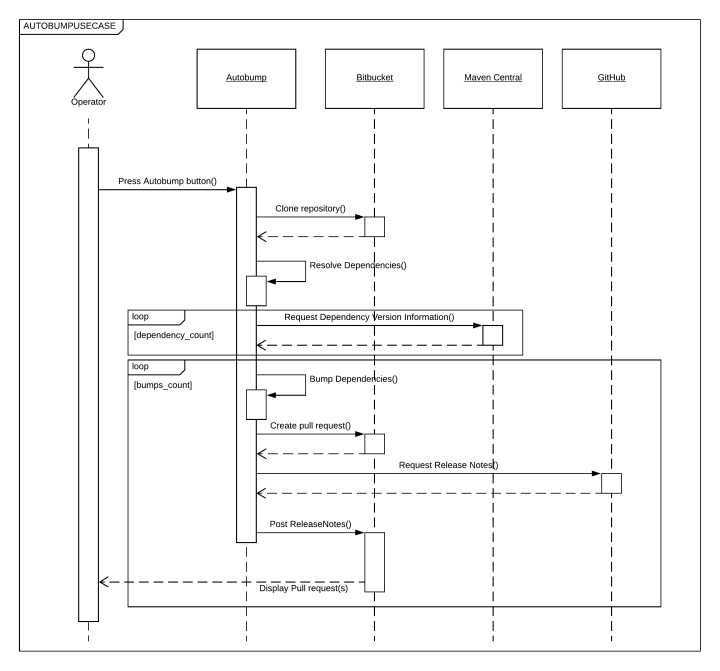
AutobumpUsecase
The AutobumpUseCase manages the main business logic that is performed by Autobump. THe figure below depicts the interaction between Autobump on the one hand and the user and external systems on the other. The figure elucidates that fairly limited interaction with the user is required. Pressing the ‘bump now’ button in the dashboard (or alternatively - entering a command in the command line interface) invokes the AutobumpUseCase that calls the appropriate objects to clone the repository, resolve dependencies, visit maven central to obtain versions of possible new releases, visit github to obtain possible release notes, and finally send a pull request to BitBucket. In the event a user has requested Autobump to run as a cron job, this Use Case is invoked on a daily basis.
RebaseUsecase
The RebaseUseCase is a fine example of the way Autobump handles events that come from the BitBucket workspace. In the event of a commit on master, the pull requests already issued by Autobump might contain conflicts with the new master. When such a commit is performed, Autobump receives a webhook from BitBucket. Autobump then makes a call to BitBucket to obtain all open pull requests. If there are indeed open pull requests, the new master branch of the repository is cloned. The branch of each pull request is then rebased to the new master. In case conflict emerges, the pull request and the associated branch are removed, and the bump is performed again. A new pull request is then sent to BitBucket, and the developer may be confident that it does not contain conflicts with the latest master branch.